|
Many thanks for permission to use graphics from their software and toposheets |
|
|
The Heaphy Track for BeginnersInfo we wished we'd had all in one place when we set out on the first big walk.
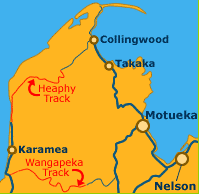
[Disclaimer: Information contained here is accurate as at March 2005] Where is it?The Heaphy Track is located in the NW corner of the South Island of New Zealand. It is 77-82 km long, depending on upon which information leaflet you have in front of you. It begins at Brown's Hut, about 30km up the Aorere Valley from Collingwood and ends at the Kohaihai Shelter, some 15km north of Karamea. Or vice versa if you go the "Irishman's Route" the other way. It's chief attraction is the enormous variety of tramping experience provided by the vastly different scenery it traverses, and the relatively easy going for inexperienced walkers. It is one of New Zealand's "Great Walks" which means effectively that huts and tracks are maintained to a higher standard than normal. We spent 6 days, but most people do it in 4 or 5 days. Some have run it in a single day. TransportPossibly the biggest single problem is organising transport to and from the ends of the track. While the track itself is some 80 km, the distance by road from one end to the other is a bit over 400 km. It's a long way back to your car. Unless you have friends locally who can drop you and/or pick you up, you are dependent on public transport. If you are older and/or less fit, it is a good idea to stay at Brown's Hut the first night, get a decent rest and make an early start to a longish and somewhat demanding day. (Browns Hut provides no gas cooking facilities. We heard much to recommend The Naked Possum restaurant on the Aorere Valley road, though it's a way back down the road.) The younger and fitter can look at arriving at Browns Hut about 10 am to midday, having started from Nelson with the dew still on the grass, and still make it comfortably to Perry Saddle Hut before dark. Public transport is available in the summer season. In practice, this means a couple of trips a day from Collingwood or Karamea to the start of the track, but these may not necessarily coincide with your intended arrival/departure time. You can arrange private minibus hire to suit, but there is a minimum charge that may well chew into the budget of a single backpacker. Spread over a party of 3 - 5, it is more economic, and you can sometimes set this up at Heaphy or Perry Saddle when you know who else is likely to be finishing around the same time. A free phone is available at each end of the track to phone for transport. If you intend staying overnight at the Karamea Holiday Camp (about 4-5 km south of the town), the proprietor will collect you from, or deliver you to, Kohaihai for $5, as opposed to the $8.50 normal charge, and he is happy, free of charge, to run you into town for a meal (excellent fish and chips) at the pub and will pick you up afterwards. He is a good guy. Your local DoC (Department of Conservation) office will be able to provide you with up-to-date details of available transport. Air transport, helicopter or light plane, is also available and once again, DOC can direct you towards appropriate and up-to-date information sources. AccommodationBack country passes are not valid on the Heaphy Track. You will need Heaphy Track hut passes for each night you intend to stay at a hut or camp ground. These are about $20 per person per night, less for children and less in the May to October season, and can be purchased from the DOC office at Takaka, or at your nearest DOC office. Campsites are about half the hut rates.They do not guarantee you a bed in a hut, but mostly people move over to make room and only rarely will you need to sleep on the floor or on the deck outside. We had an easy run through with spare beds every night. The night before we reached Perry Saddle Hut, 50 people were looking for space in a 26 bed hut. (It is an interesting exercise watching the body language when a group of ten suddenly arrives at a hut. Small parties are much more welcome.) Increasing popularity of the Heaphy and occasional severe overcrowding has meant that from November 2005 DoC is introducing a hut-booking system, which will limit numbers on the track to match available resources. This means that interest, especially from overseas, further increases, and booking often becomes necessary some time ahead. There are seven huts on the track and a couple of shelters. The biggest hut, the Heaphy, can accommodate 28 people in bunks, and most of the others are just a little smaller. The Gouland Downs hut has bunks for 8 only. The bunk section consists of a platform, or several, covered in single vinyl-covered foam mattresses side by side. In some huts, sleeping quarters are walled off. In others it is all one large room. If it is crowded you may need to bunch up a little to allow others some room. Just remember, it might have been you looking at sleeping on the floor, and make a little space. Except for Brown's Hut and Gouland Downs Hut, all huts are provided with several 4-element gas cookers, with a half dozen or so garage sale aluminium saucepans. These facilities are serviced regularly in the summer season, but occasionally run out of fuel. You should take your own portable gas stove, fuel and cooking gear for emergencies and between-hut brew-ups. Small trampers' stoves such as the Kovea are perfectly adequate. (Not knowing this we overcatered drastically with a couple of stoves and 4 canisters. Unless you're a tea or coffee addict, one stove and one canister of gas will serve for the whole trip, with a second canister if you are cautious by nature. (An average gas canister contains about 227g of gas and a basic rule of thumb is that 20g will boil a litre of water.) Apart from Brown's hut and lunches, we used hut gas. Take your own lighter or matches. (Incidentally, gas canisters may not be taken on board aircraft. You need to buy gas canisters locally and leave what's left at the last hut with a sign saying "free for removal". Which reminds me. There are no refuse disposal facilities. Pack it in, pack it out, or burn it in the hut fire. NOT PLASTIC! It stinks the hut out. It is a truly amazing experience to spend six days out of sight of litter. While candles are nearly always present in huts, it may be a good idea to include at least one. They are a better source of communal light than LED headlights, which are more suited to personal use. (LEDs, by the way can be extraordinarily bright on full beam, and even a 3 LED setting can dazzle other people if you look directly at them.) All huts and shelters have a clean water supply, sinks and benches for cooking and washing, and supply biodegradable detergent, scrubbing brushes, and cloths for wiping down tables, etc. In addition, there are innumerable streams, creeks, grottos and waterfalls en route that will provide good water. (While there has been no report of giardia in the Kahurangi National Park, trampers are advised to boil water if they wish to guarantee water safety.) Once again, operating on website advice that suggested a lack of water en route on days 1 and 6, I wound up carrying an extra litre I didn't need. I expect to get through about 3 litres of water most days - I sweat prodigiously. Nevertheless, I never once emptied my two 750ml drinking water bottles without an opportunity to refill them. The extra litre in my pack was simple self-abuse. NOTE: Carol, who walked the Heaphy with us, repeated the walk later at a different time of year and reported that many of the streams/grottos, etc mentioned above had no water flowing in them. Check with DOC before you go for current state of water supplies en route. With all the talk about over-crowding, you might want to wonder, "Why bother?" On the track itself, you might meet one or two people at most during the day. It really is the wide open spaces. ToiletsAll huts and shelters on the Heaphy are equipped with either clean long drops or flush toilets, all of them with ample paper, at least in the season. DOC advice if you are caught short on a track is to carry your own toilet paper, and to move at least 50 metres off the track and dig a small trench with a trowel or other tool and to cover the remains afterwards. This is about as fatuous as it gets, except for advice on what to do if you suspect 1080 poisoning, which is even more fatuous. Given that the area on either side of the track is often nearly vertically above or below you, bushcrashing with an urgent need for a shit, at the same time rummaging in your pack for your trowel (sic !!!!) is not even a starter for most people. However, as it is at least possible that some of the time you may suffer some diarrhoea, carry enough paper to get you through a day. You can replenish it at any hut or shelter. (So far, giardia infection has not been reported from Kahurangi National Park, but lack of normal access to soap and hot water can breed carelessness with hygiene.) TrainingI am 64 years old, 181cm tall. I have two artificial hip joints. For most of my fifties I was crippled with osteoarthritis. In August 2004, I called at my GP's office for a routine prescription, and he took the opportunity to strongarm me onto the scales and then he took my blood pressure. 131kg and 175/115 for the BP. Creeps up on you, doesn't it. I changed my diet to emphasise greens and fruit and low density carbohydrate, and eased off on rice, potatoes, bread and pasta, the high density carbohydrates, and I started walking 1 km a day around local roads, uphill and down, gradually extending that to about 6-8 km a day. In 3 months I was 9 kg lighter and my blood pressure was around 135/85. I began carrying a pack and tackling some longer and steeper walks locally and in the Waitakere Ranges. My weight came down a further 2 kg, and my BP dropped to 120/75. Weighing in after the Heaphy, I had dropped a further 3 kg. Even if you are generally fit you do need to do some training, especially with a decent sized pack. An injury to ankle or knee when you are 3 days walk from the nearest doctor is no joke, and you need to strengthen the muscles that stabilise your knee and ankle under load. (See also, hiking poles.) You may wish to invest in an emergency locator beacon (available from outdoor specialists or Dick Smith's) which will summon a helicopter and paramedic to within 50m. There will normally be a delay of around 3-5 hours before it arrives. Without that, you are dependent on passers-by meeting a ranger who will radio for help as required. That can take a couple of days, depending on where the ranger is at the time. S/He is walking too, and often out of radio contact. There is no cellphone coverage for 99.9% of the track. First Aid KitYou should carry a small standard first aid kit with antiseptic, dressings, etc, and preferably have someone in your party comfortable in its use. You may wish to include knee and ankle support bandages in your kit. Beyond that, I found a Voltaren or Nurophen Plus tablet useful in getting to sleep when I was generally aching and finding it hard to get comfortable at night. Voltaren requires a prescription from your GP. Nurophen Plus is available OTC, and contains an anti-inflammatory agent which is helpful. Neither of these should be taken without reading directions carefully. Voltaren Gel is also helpful, and available OTC in New Zealand. You need chapstick for your lips, and sunscreen for much of Days 2, 3 and 6. Vaseline or Rawleigh's Ointment is useful for chafing - use it as soon as you notice the irritation. If your boots rub a little, protecting the area with a sticking plaster will prevent blisters forming. Miranda used Elastoplast strip dressing. If you suffer from migraine, you need to be prepared to deal with it early before it takes over. Most sufferers will know what I am talking about. If not, consult your GP or a migraine support group. Miranda was able to ward off a pending migraine by recognising early symptoms and dealing to them. You simply cannot afford a headache that takes you out for a couple of days. Same goes for food poisoning. Watch the simple hygiene rules. (Know how to identify koromiko. Eating the growing tips is an almost guaranteed remedy for diarrhoea.) Wasps can be a problem, more so in February-March. I was stung once on the first day, and saw many wasps both that day and on day 4. Hydrocortisone ointment is helpful, or antihistamine tablets or ointment if you are more sensitive. Or you can tough it out. BUT, if you are stung on the head or throat, medicate as soon as possible. That's what first aid is about in this case. Do not wait for any swelling to start as you may be unable to swallow by that time. We took Vitamin C and B complex tablets with us. Both of these are water soluble, and given the amount of water sweated and drunk while tramping, levels can drop. Not high priority, but useful. The same applies for electrolyte replacement powder. Sometimes no matter how much you drink, it never seems quite enough, and often the key is the electrolytes sweated out during the day. Horley's make a product called Replace which doesn't taste particularly wonderful (Tastewise, anything from Horleys counts as medicine) but can prevent headaches due to electrolyte loss and seems also to deal to the unsatisfied thirst mentioned above. I prefer the Lime flavour. I've never heard any agreement about which fungicide is best. I use liquid Resolve. You'll know from experience what works for you. Take some. In a tramping environment, your feet are specially vulnerable to athletes' foot, and it can flare up very suddenly and painfully. In fact it may pay to treat your feet and boots thoroughly a week or two before leaving home to make sure. Gran's Remedy or some similar antifungal powder for boots is also useful on a day to day basis, especially if you get the inside of your boots wet. The combination of feet, warmth and wetness will create an awful smell, otherwise, as fungi flourish. A small tube of Zovirax is also handy in the event of a cold sore infection. Your lips are more exposed than usual to harsh conditions of the kind that trigger cold sores, and a face full of scab takes the edge off things. Dimp or other repellant will help keep mosquitoes at bay, but sandflies are persistent little bastards. The best sandfly repellant I have found is one called Aerogard Tropical Strength. One woman had a gauze veil that fastened around her neck. As long as you are moving, you seem to be difficult to locate, but once you stop, it's all on for them. Fortunately after dark, they are less bothersome, and Heaphy Hut at least has screens across the windows. Personal Gear: Sleeping BagYou'll need a sleeping bag. Miranda borrowed a Fairydown (Funny how Aussies have a problem with that name) goose-down sleeping bag which was warm as toast, very light, and compressed to 9 litres approximately. Because of my size, I was obliged to get one custom made and Fairydown was out of my price range. My custom-built Domex sleeping bag, 0-5 degrees range of temperature, cost me no more than their biggest standard model, but the downside was that compressed, it still demanded 45 litres of space in my pack, and it was quite a bit heavier than Miranda's. While the weather got a touch chilly at night, especially up top, nowhere was it cold enough in the huts to require that I go into Arctic mode, or even do up the side zip of my bag. I didn't even need my polyprop underwear to sleep in. Given that the underside of a sleeping bag is compressed and provides little insulation, some people have a bag with the bulky underside replaced by a double layer cloth pocket into which they slide an inflatable air mattress (Thermorest). This packs down into a much smaller volume than a double layer sleeping bag, and seems like a good idea. I suggest that you don't buy a severely-tapered (mummy) sleeping bag unless you have a chance to try one first. Many people I have spoken to find the restricted movement in them a major problem Personal Gear: PackYou'll need a pack. You have to carry everything you'll need in the way of food and clothes and sleeping gear for the entire trip. I find a 14 kg pack so light as to be almost unnoticeable once I'm fit. But every kilogram after that is felt exponentially. If you can keep your pack weight 16 kg or below, walking will be relatively effortless, even uphill. 60 - 75 litres is ample for most purposes. A bigger pack is a temptation to fill it with things you might need, but probably won't. On the other hand, when I pack my sleeping bag, I need a large pack if I am going to carry clothes and food for several days. If you're on the large side, or have a bulky sleeping bag, like me, you may need to look at an 80-90 litre capacity. Big people have bigger clothes as well as bigger sleeping bags. And often bigger appetites. Packs come in two main varieties: Trampers and Travellers, with a third, the Adventurers, something of a hybrid. A travellers' pack is typically covered in zipped pockets, with a large zip enclosing the main volume of the pack, and a detachable day pack with it's own harness. The trampers' pack is typically top loading with perhaps one pocket on the back for frequently used items. It is narrow, so that it does not catch on scrub at the edge of the track. The Zips are few to minimise leakage in wet weather. The harness is usually more finely adjustable. It's a tradeoff, depending on where and how you are going to be using that pack. Macpac has a longstanding reputation for comfort and quality in New Zealand - and overseas. One Planet packs are designed in Australia for conditions typically a little drier than here, but for sheer comfort they are difficult to beat. My 80 litre One Planet Strezlecki carried 18kg comfortably. Don't buy a pack without trying it on under load. In a shop they are typically filled with newspaper. Ha ha ha. You should visit a greengrocer beforehand and arrive with a couple of 10kg packs of potatoes or rice, or bring along several 3 litre plastic juice containers filled with water, put them on board and then try the pack. Remember, what is a negligible discomfort on a couple of circuits around the shop can become hell over 15 - 20 km. If possible, borrow a few different packs from friends for training with beforehand, to see what works best for you. Packs (and sleeping bags, etc) are also available second hand through avenues such as www.trademe.co.nz. Get somebody with experience to help you with the strap adjustments until you are familiar with what does which. It's a bit like adjusting the harness on a pony saddle. (Or dressing a pre-schooler, Miranda reckons.) Personal Gear: BootsThis is a controversial area. There are two schools of thought, well summarised on the Aussie tramping website, http://www.bushwalking.org.au/FAQ/FAQ_Footwear.htm "In simple terms, we have those who swear by solid boots and those who swear by light-weight footwear such as joggers, Dunlop KT-26s and the ultra-light Dunlop Volleys (DVs). We even have a few who use "sports sandals". The arguments for boots include durability, waterproofness, ankle support, crampons and tradition. The arguments for the light-weight ("DV") brigade include low cost, light weight, comfort, minimal impact and in some cases improved safety. Some regard the battle as one between an historic military rearguard and more enlightened users of modern technology; others think the DV wearers are mad." Whichever you choose, if you're buying new, wear them in around the local countryside before attempting a long trek. Discover their virtues and their vices. My personal choice, and Miranda's, is a pair of sturdy and sublimely comfortable Merrells. Even now I can't lace them on without a shiver of anticipatory pleasure. My socks are merino wool farmers' socks with a loop pile. (Wash them and dry them inside out to extend the pile life and slow felting.) I've tried more expensive and lighter weight "tramping" socks but they provide nowhere near the comfort. I took a pair of socks for each three day period, plus a spare set in case I got wet feet, and for wearing at night round the hut, when clean socks are appreciated. You need to have your boots inside the hut at night to prevent their being taken apart by keas. If they're smelly, plug the tops with your next day's socks or you will not be popular. Gaiters are extra weight, but can help you through a small ford by giving you an extra couple of seconds before the water percolates through. Alternatively, some old supermarket plastic bags and a little duct tape will give you a short duration lightweight set of gaiters in an emergency. (If you need to go outside at night, and you have dry socks and wet boots, the same bags can cover your foot before you stick it in the boot and will get you dry-footed to the toilet and back.) I can't stress too much the importance of comfort and support. My mate, Dan, uses special gel heel inserts to absorb impact. The Merrells have their own innersprung heels. I did the entire Heaphy without a blister or even a rub. En route, I encountered a woman who needed to be helicoptered out. I'm not sure what she was wearing on her feet, but after three days walking her heels were so badly bruised she couldn't walk more than a yard or two. Bruised heels take a long time to come right. Personal Gear: ClothesBig people like me typically have clothes that weigh a bit more, so this is worth some thought. All you need for regular wear is one pair of shorts and a shirt. These should be a dripdry material of some kind, and the new microfibre shirts made by Line 7 are excellent, and comfortable as well. Most outdoor sports shops have their own equivalent of these. (You can please yourself whether you get long sleeves or short, but applying sunscreen is still a good idea.) [I'll add a rider to this: I spent a day in the Waitakeres recently on relatively open tracks. Despite wearing the above shirt, I was significantly burned on my chest and shoulders.] Merino wool gear is highly favoured by many, but expensive. It's light weight and breathes, is supremely comfortable, but it has also all the warmth retaining qualities of polypropylene. I've got it on the Xmas present list for next year. Cotton is out. It absorbs sweat, becomes heavy, stays damp. Especially, denim is out. Miranda bought silk tops from the nearest SaveMart, and these were ideal. (I don't fit op shop sizes for the most part.) You should be able to hang this gear up indoors and have it dry overnight. You can then afford to wash them whenever you feel like it. I wore a standard cotton peaked cap which absorbed sweat pretty well and kept the sun off. Next time, I'm taking a floppy towelling hat of the kind you can dip into icy streams, wring out, and place back upon your overheated head. Some people wear a bandana for the same purpose. When you arrive at a hut, your shirt and shorts will be wet with sweat. Change into dry gear. For me that meant a long-sleeved shirt and a lavalava, (sarong) with optional polyprops and/or a polar fleece top if it was cold, and clean socks. Alternative to a lavalava, a pair of track pants in polar fleece or something equally light is good. I dislike the look and the historical colour range of polarfleece intensely, but there is no question that a polarfleece weighs a lot less than a jersey and seemed perfectly warm enough and comfortable to wear, and, moreover, does not stretch to knee length if it gets wet.. Underwear is an exception to the "no cotton" rule if you want to minimise the likelihood of jock itch or whatever else ails the human genitalia. I took a fresh pair of cotton underwear for each day. That's weight I'm prepared to carry. Some experienced trampers, on the other hand, are heard to say something like, "Underwear? I don't wear any, so I can't really comment...." Polypropylene (Thermal) UnderwearYou should take at least one set of long-sleeved and long legged polyprops, two sets if cold and wet weather is likely. They're very light and very warm. Polyprops are supreme insulators. Major use is as evening wear under longs, or to supplement the warmth of a sleeping bag on a cold night. They also have a part to play in cold, wet weather, when a set of long polyprops is worn under shorts and shirt as a first measure. Some polyprops can be a little scratchy to wear, but for a little more money you can go to "Ultrasport" polyprops, which are much softer and originally designed for performance athletes. Personal Gear: Wet Weather GearGet this straight. Rainwear is not for keeping you dry. If you are walking, you will sweat and your clothes will get wet from the inside, and even more so if you are wearing a jacket. Rainwear is for keeping you warm outdoors in cold, wet, weather, and this means keeping the windchill out, and bodyheat in. We're mainly talking windproofing rather than waterproofing. On the other hand we don't want your middle and inner clothing layers soaked in icy rain. Mostly, unless it is cold and/or very windy, you won't use raingear. You will walk through rain in your shorts and T-shirt, with a set of polyprops underneath if it's heavy rain. The exercise of walking will keep you warm. And you change into dry gear as soon as you reach shelter, wring out your clothes and hang them up to dry overnight. In more extreme conditions, use a polyprop bottom layer, then longs, shirt, and fleece, then hooded "waterproof" jacket and leggings with polyprop balaclava and gloves if needed. This is known as layering. You can read more about it at http://www.bushwalking.org.au/FAQ/FAQ_Clothing.htm#Shell and at http://www.bushwalking.org.au/FAQ/FAQ_Rainwear.htm. Many of the comments on this website relate to specifically Australian conditions which are far harder on clothing than anything you'll find on the Heaphy, but the principles set out are pretty clear. (I found Goretex much heavier than the lightweight nylon Rainbird jackets Miranda and I took with us, and considerably more expensive. If you're doing a lot of serious alpine tramping, maybe Goretex earns its weight, but on all the occasions we wore our jackets, the lightweight ones were more than adequate. The leggings I got were a $20 pair from The Warehouse. If you want heavier duty wear any farmers' supply store (RD1, Anchormart, etc) will have a good range at something less than you will pay in specialty outdoor shops. The disadvantage of lightweight raingear is that it can snag and rip easily on thorny scrub. As far as the Heaphy is concerned tracks are wide and you won't be doing any bushcrashing. It's possible you may get from one end of the Heaphy to the other without using any of your extreme weather gear. But mountain weather, like the sea, is extremely changeable. You don't take a lifejacket with the intention of using it, rather because IF and WHEN you need it, it's a lifesaver. In addition to clothes, you need to consider pack waterproofing. You can buy a heavy duty plastic pack liner from an outdoor shop, fine for more robust conditions, but for most purposes a reasonable weight garden waste sack will do the trick, along with a small roll of duct tape for running repairs. Clothes can be stored inside this in sealable or ziplock bags as an extra precaution. The more experienced trampers had what looked like a small, lightweight, waterproof fitted sheet which fitted over the pack from the back in rainy conditions. These are available from most outdoor sports specialists. They come in several sizes. Make sure you get one to fit your particular pack. I carried a manuka stick about 1.5m with a whipped handle. I have experimented with the classy looking and very light trekking poles sold in tramping shops, but I haven't been able to get them to feel comfortable. Not everybody uses a stick, but if you don't, the wear and tear on your ankles and knees on rough ground is considerable. Think about it. You have 18 kg on your back. If you stumble, and all you have is your ankles and knees to stay upright, a lot more effort is needed than if you simply use a stick as a third leg to make a correction from the top as it were. Also, on downhill treks which are often hard on knees and ankles a stick can make a considerable difference. Miranda is experimenting this year with a pair of walking poles. We'll keep you posted. (If you're not in a hurry, wait for the Kathmandu sales, when you can often buy good quality poles at half price.) Take advice from shop assistants. I've never found one who wasn't knowledgeable and helpful. [STOP PRESS. Miranda found the poles so valuable after a couple of training walks I took the plunge and bought a couple at the Kathmandu sale which was still on. There's an adjustment period of about a week while you discover all the muscles in your upper arms and shoulders that have been on holiday since forever, but once that's past and the motion is automatic they are a godsend. Try standing on the bathroom scales with your pack on. Place the poles on either side with just a light pressure on them, and watch the scales drop back about 3 kg as soon as you do so. That's weight your ankles and knees do not have to sweat over. You can buy poles with an innersprung feature to minimise shock to wrists and shoulders, but these often soak up energy going uphill. If you get innersprung poles, make sure you can turn this feature off when you don't want it. My poles are not innersprung, and I haven't missed it. Some poles come in lefthand and righthand forms. As poles are sold singly, again, make sure you get a complementary pair. At the budget end, you can cut a pair of 20-25mm manuka poles about 150mm longer than the distance from ground to elbow, and whip a 150mm handle onto them. At a pinch, I have even used flax poles - lightweight and surprisingly strong, though ultimately more suited to balance than to loadbearing.] Towels and Toilet GearThere are two schools of thought. One school buys a packet of superabsorbent Chux cloths from the supermarket. The other uses a microfibre superabsorbent towel at a hi-tech price. We got a couple of these second hand off http://www.trademe.com/. They're good, but they do take ages to dry, and you need a plastic bag to pack them wet. I'd probably make do with the Chux cloths if I was doing it over again. [This I did on the St James Walkway this year. They were fine.] There is one school of thought that maintains washing is unnecessary and even undesirable, as mosquitoes tend to be less attracted to unwashed bodies. But so are people. It's a trade-off. A comb is useful, if appearance matters, but mainly for picking bidibids out of your sox, Beyond all this, there is a fascinating category of gear that is what I call "luxury". For one guy it was an electric toothbrush. For another guy it was a battery operated electric razor. Another had a largish book of birds. One woman had a full makeup kit and spent about twenty minutes applying it each day. Miranda had a crossword book. I had a vast quantity of batteries and a digital camera. Also, we had maps, the Cobb and Heaphy 1:50,000 series topo maps, which are scarcely justifiable on the Heaphy unless you are doing some serious off track exploring, but it was fun sitting down with them and plotting where we'd been and where we were going. I like maps. FoodIf funds are unlimited, go down to the nearest outdoor sports shop and select from a wide range of very expensive freeze-dried meals. You simply tear off the top of the pack and add boiling water and bingo, in ten minutes your dinner is ready. In their American army version, these are known as MREs, which the soldiers translate as "Meals Refused by Ethiopians". Read the Instructions. If you go down this path, please read the instructions carefully. The sight of one tramper looking at a baked bean meal consisting of a very thin tomato soup with a handful of white beans floating on top will stay with me forever. He had neglected to check exactly how much water was required. Reconstituted hash browns don't really cut it with me either. If you're looking at a lot of overnighting, an Ezidri (or Harvest Maid) home food drier - new about $NZ300, but often available on Trademe - is a gem. We had a loan of one and it was ideal. Get the one with the variable setting up to 65 degrees. Over the weeks beforehand we experimented with a range of recipes and meats and eventually settled on minced beef and chicken or finely cut strips of beef or chicken. [This year we settled on mince alone as even finely sliced meat remains a little tough. If it's only a few days you can survive on ground meat, especially if you vary between chicken and beef and vary the flavour. See Food for Tramping] We pre-cooked a variety of mince meals - lean chicken and beef do better than lamb and pork. Make sure it's lean. Animal fat does not contribute to the flavour of a dried meal if there's a lot of it. My thanks to Felicity for pointing us in this direction. Typically, we'd dry-fry the meat in perhaps a little ghee or oil until it was pretty well done, set it aside and then develop a sauce of some kind in the same pan using left behind fat, and some combination of onions and garlic, curry spices, salt and pepper, peanut butter and soy, canned pasta sauce, etc, plus a little thickening - flour, rice flour etc. Combine the two and cook very gently for a while until you can lift it in a slotted spoon without dripping sauce. Take the meal and spread it lightly over one of the layers of the drier and set it to dry at 65 degrees for 5 - 8 hours depending on local humidity factors. Get the mince to a crisp dry state, then seal it in a ziplock bag. To reconstitute, about an hour before you want it empty the contents of the bag into a pot and barely cover with water, then leave for an hour. Heat and evaporate any remaining water and organise the other elements. Finely sliced chicken or beef will also taste OK, but tend to remain somewhat leathery.
Jerky is also an excellent resource. I use a South African biltong recipe. The finished product is leathery with perhaps just a trace of pink at the centre. Miranda experimented with a honey soy mix marinade, and this was delicious. Our cat thought so too and ate most of the bag in preference to the biltong when we left our supplies unsecured. Hygiene is vitally important when dehydrating. Make sure all plates, utensils, hands etc are thoroughly clean before starting. Use new ziplock bags. I haven't really tested these meals, but my inclination is to use the meal within 2-3 weeks. The positive side is that you don't have the taste of the preservative that enables MRE's to be stored more or less indefinitely. [Postscript. I found a dried beef dhansak meal recently which had been sitting, sealed, in a cupboard for some three months. Somewhat cautiously, I cooked it up for a meal with good flavour and no subsequent ill effects.] Rice can be cooked and dehydrated in the same way. You don't save any weight, but reconstituting is simply adding an equal volume of boiling water and leaving for ten minutes. Done. Ready to eat. Do it in a mug if your billy is in use. Or use a hut saucepan. Supermarket instant mashed potato is good. We took a little ghee and powdered milk and salt to simulate the real thing, and added some onion flakes for extra flavour. You can slice tomatoes finely and dry them also. They are very light, very flavoursome, and reconstitute very well and you can throw them into a soup or into your mashed potatoes. Capsicum also dries well, if a little leathery, and celery. Mushrooms and broccoli less successful. Couscous is another fast and easy carbohydrate. Check everybody likes it first, as it is not a universal favourite. Use chicken stock, tomato etc to flavour it. Or you can buy pre-flavoured varieties. Pasta we saw quite a lot of on track. We took some risone - shaped like large wheat grains - but in the end, we preferred the rice. By and large, greens are not easy to come by. Another reason for the vitamin C, though scurvy is unlikely to develop in 6 days. We used Surprise peas and beans and mixed vegetables, and our own dried tomatoes, capsicum and celery, and I have to say the Surprise beans were far more tasty than I expected. (I refuse to eat deep-frozen beans as being both soggy and tasteless.) We organised noodles and vegetables for a couple of lunches but it was fussy. Mostly Arnott's Vitawheat or Ryvita crackers were the preferred lunch, with pre-sliced processed cheese - keeps excellently and not too expensive - honey, jam or peanut butter. We used a little ghee on the crackers but it's not the same as butter. The fillings we stored in small plastic sealable containers, inside a large plastic bag. (Once again, you're not going to be bored out of your tree eating the same lunch for two or three days, so you can afford to keep it simple.) Late note: Salami/Beer sticks keep well over several days and add a further dimension to lunch. Drinks. Neither Carol or Miranda was a fan for tea with powdered milk, and I found I preferred Trim Milk powder to Full Cream, even though I dislike Trim Milk in everyday form. They drank their tea weak and black, or made coffee, also black. Bournvita/Milo was a nice evening drink and we used the Trim Milk Powder for that quite satisfactorily. Breakfast. Each of us organised his or her own breakfast. Carol used precooked oatmeal. Miranda and I had toasted muesli with a generous boost of chocolate flavoured protein powder and Trim Milk powder. I am of the belief that a ration of protein with each snack or meal gives the body permission to use fat reserves, and I lost 3 kg during that week. (For the St James walk, we left out the supersweet chocolate protein powder and simply added extra trim milk powder to the muesli. It was fine.) I'm still trying to source egg-white protein in powder form.
Snacks. Morning Tea was probably the biggest snack affair - usually peanut and raisin chocolate slabs and dried fruit, or jerky, or.... We were looking for a touch of protein combined with moderate fat and plenty of high-density carbohydrate. On uphill or cold tramps, or with a heavy pack, it is possible to use 3-4 times one's normal calory ration. Small salami sticks kept well and were very popular.
It pays with snacks to pack individual rations and let people snack as they feel the need. Dried figs, apricots etc are wonderful. Home dried bananas are delicious - but take a hell of a long time to dry. (Don't even think about the hard plastic chips that go as dried bananas in the bulkfood shops.) Throw in a handful of chocolate chips and a good long drink of water and bring on the next hill. (I think we do get a touch more austere with time. DCW 2007) Allow for an extra day's food in case of flooding or other misadventure. The fords on the road to Brown's Hut have marooned many trampers. Keep it lightweight and simple - mashed potato, etc, with some stock cubes for flavouring, for bulk, and high density carb - dried fruit, chocolate, salami, etc - for warmth and energy. Fear of HeightsThis can be a problem of sorts, depending on how sensitive you are. It manifests in the shape of a number of suspension bridges, and many sections of path where the land falls away steeply to one side of the path, sometimes for a hundred metres or more. I have a longstanding and considerable fear of heights. Nevertheless, I had seen photos of one of the standard DOC suspension bridges, and it seemed to me that it was doable, and I had thankfully no inkling of the steepness of the land on either side of much of the path. On Day 2, between Gouland Downs Hut and Saxon Hut, I encountered the first two suspension bridges, relatively small, but extremely flimsy to my jaundiced eye. I planted my 119 kg, plus pack, on the approach to the first bridge and nearly wobbled straight off it. I backed off and forded the stream and the same with the next one. That night was hell. In a leaflet I found at the Saxon Hut, I read notes about the track which suggested that at least two of the remaining bridges were over rivers without fords and were much, much longer and higher than the ones I had backed off. I was an insomniac cot-case. In the event, I solved the problem, and it seems to me that the advice I offer might help others considerably. Firstly, the first two suspension bridges seem much flimsier and do in fact wobble much more than those that follow, and the netting along the sides is lower. The good news is that they are avoidable, if you don't mind wet boots and if the rivers are not in flood. However, if you have to use them, the next piece of advice is this. You cannot tip out of them, however uncomfortable the motion. We eventually arrived at Lewis hut, with the first swingbridge over the Lewis River about 200m up the track, about 35m long and about 4-5m above the river. I sat down, made a cuppa and changed into fresh clothes, had a nap, and headed out with Miranda, without my pack, for some practice. I was very nervous as I set foot on the bridge. It consisted of two wires just below shoulder height, two at waist height, two at knee height and four across the bottom. (See illustration at top of page.) The bottom was covered in the kind of sturdy 50mm diamond mesh you see on some suburban fences. It was secured to the two outside wires and every 400mm or so there were two strips of aluminium bolted together either side of the bottom wires, clamping the wires to the mesh. A fairly sturdy plastic mesh ran from one of the waist high wires around and under and up to the other waist high wire. Every two metres, there were uprights to which the bottom, knee high, waist high and shoulder high wires were attached, maintaining their distance apart from each other. Only one person at a time should be on the bridge. When I was about 2-3 steps out, and still able to get back quite easily, Miranda told me to rock the bridge as much as I could to see just how severe it could get. I did so, and discovered for myself that there was no way I could get enough angle on the bridge to tip out of it. I relaxed a little and the motion steadied and stopped. That was lesson two. If the bridge starts to wobble, and it will, do not freak out. Relax and stop moving, and the bridge will stop too. Occasionally strong gusts of wind will cause a somewhat unnerving sideways wobble. Once again, stop and wait for the gust to pass. You will not tip out. Next lesson. If you walk on a suspension bridge the way you walk on a path, it will wobble violently. Do not bounce. What you need to do is slide each foot out in turn, staying close to the centre bottom wires, and gradually transfer your weight forward, keeping some of it on the two upper wires, treading as lightly as possible. Keep your eyes on the far end of the bridge and do not look down. If you do look down and start to wobble, just stop, and the bridge will stop too. Return your eyes to your goal and slide your next foot out. If it helps to still your mind, count each step aloud to yourself as you go. The next bridge, the Heaphy crossing, was about 400m further on. 65m long and about 8m above the river. More practice. I used the same techniques I had discovered on the Lewis Bridge and nailed that one too. I counted to 142 on that bridge, and I had to consciously stop and relax several times as I felt myself beginning to freak. Stop and the bridge stops with you. Then back again to the Lewis Hut across both of them. For some reason, I had imagined that the Gunner bridge was much bigger than either of these. In the event, it was about 2m higher and a bit shorter than the Heaphy Bridge. It rained like hell all night and the Heaphy was quite unfordable, so I was pleased I had at least practised the crossing. What about with my pack on? We headed for the Lewis Bridge, and I stepped out cautiously. Same as before except I was much heavier and it was absolutely essential to sneak that foot out gently and transfer weight gradually, and hang as much weight as I could off the two shoulder height wires. But I got there. Same again at the Heaphy and the Gunner and the Murray. I was home. So I thought, until the next day the Swanburn bridge arrived unexpectedly and almost threw me with its suddenness. I was tired. I stopped, filled up on a chocolate bar and some raisins, and nailed that one too. One other piece of useful advice: Insist that people shut up while you are concentrating on your way across. They can encourage you beforehand and applaud you afterwards, but noise during the event itself can distract you and generate a wobble that you can do without. My other fear, of land dropping away to one side, I learned to deal with on Day 4 on the descent to the Lewis Hut. I discovered by experiment that a track 1.8m wide always felt safe, a 1.2m width was just safe, and I started actively freaking when the track narrowed to about 900mm. Now, there are many patches on the descent where the path narrows to 900mm, but nearly always with plenty of vegetation on the downhill side. These are good for practising a no-freak transit. Negotiate them with your eyes towards the uphill side of the path, knowing that if you do look downhill, it won't be as fearful as a sheer drop. After you have nailed a few of these, the odd exposed section of track becomes relatively straightforward. Good walking. Myths and Fantasies.Now, there is a myth that if you start from Brown's Hut, you get all the hard stuff over straight away, and the rest is downhill. Not true. Basically, either way, there is one day all uphill, one day all down hill, two days undulating and two days mostly flat. The Day 3 Irishman's climb from Lewis to James Mackay Hut is 690m over 12 km. The Day 1 recommended climb from Brown's to Perry Saddle Hut is about the same spread over 17km - not so steep, but almost half as long again. You choose! Speaking of myths and fantasies, DOC estimates of the time needed to traverse various sections of track are prime examples. To give you just a small idea, the estimated time from Brown's Hut to Perry Saddle Hut is 5 hours to cover 17 km uphill. At the top of the track is a sign advising that the time estimate for the downhill journey is also 5 hours. Carol's husband Mike accompanied us for the first 2h 30m of the uphill track and then spent 53 minutes to reach Brown's Hut on his way home. Oldies and fatties tend to travel about 2-3 kph uphill and 3-4 kph downhill. HistoryThe track is named after Charles Heaphy. In 1846, while a draughtsman with the New Zealand Company, he and Thomas Brunner (a surveyor with the company) were the first Europeans to traverse the coastal portion of the modern track. At the time they were on an exploratory trip along the West Coast with a Maori guide, Kehu. The inland portion of the route remained uncrossed by Europeans for more than a decade after Heaphy's coastal trek. A gold miner named Aldridge is believed to have traversed it first, in 1859, followed in 1860 by James Mackay, a warden on the Collingwood goldfields. Mackay returned with a team of men to bench the track later the same year. Over the ensuing years the route was developed to a pack-track standard by prospectors, but by 1900 it was overgrown and infrequently used. When the former North-west Nelson Forest Park, was established in 1965, the track was cleared again for use by the public. The former New Zealand Forest Service improved the track facilities and these are now maintained by the Nelson and Buller conservancies of the Department of Conservation (DOC). It is fascinating to see the somewhat different philosophies exemplified by these two bodies. About half-way between Saxon and James Mackay Hut, there is a sign indicating the conservancy boundary. On the Nelson side is a track that is usable by quad bike for its full length, and mostly longdrop toilets. On the Buller side, the toilets are mainly flush, and the track considerably narrower and rougher. Bring on the Freudians. For a pictorial record of our trip, go to http://wudhi.com/mrwalker/heaphy/index.htm
|
|